Integrate IP Insights into Your Node.js Application: A Developer's Guide
This guide shows how to add IP Insights, Opportify's IP reputation API, to a Node.js application with the official SDK. You will analyze a single IP, read the response, run batch jobs, export filtered results, handle errors, and route each result to a review step your team defines. Every method, endpoint, and field name below comes from the live Opportify documentation. Where a value is only an example, we say so.
New to IP reputation? Our explainer, IP Reputation Check Explained, covers what the score means and where it can mislead. For product details, see IP Insights.
Why Check an IP at Sign-Up, Login, or Form Submit
The IP behind a request carries context the form fields do not: whether it is a residential, mobile, VPN, cloud, open proxy, or Tor connection, whether it appears on blocklists, and who owns the network. IP Insights returns that context with a normalized risk score from 200 to 1000 and the top risk factors behind it. Your application can then send higher-risk requests to a step you choose, such as a review queue or an extra verification step. Opportify scores and flags; your code and your team decide what happens next.
Prerequisites
- Node.js v20 or later. The docs recommend Node v22.
- An Opportify API key. Create one in your Opportify account.
- The SDK:
npm install --save @opportify/sdk-nodejs
The SDK covers Email Insights, IP Insights, and Fraud Protection with one API key. The examples in this guide use ES modules, so top-level await works as shown. IP Insights calls go to the base URL https://api.opportify.ai/insights/v1.
Keep the API key out of code
Keep your API key server-side only, in a secret manager (preferred) or a securely managed environment variable, and never in source code, client-side code, or query strings. Rotate it if there is any risk of exposure. The examples below use a getSecret() placeholder for whichever secret manager you use.
How a Request Flows
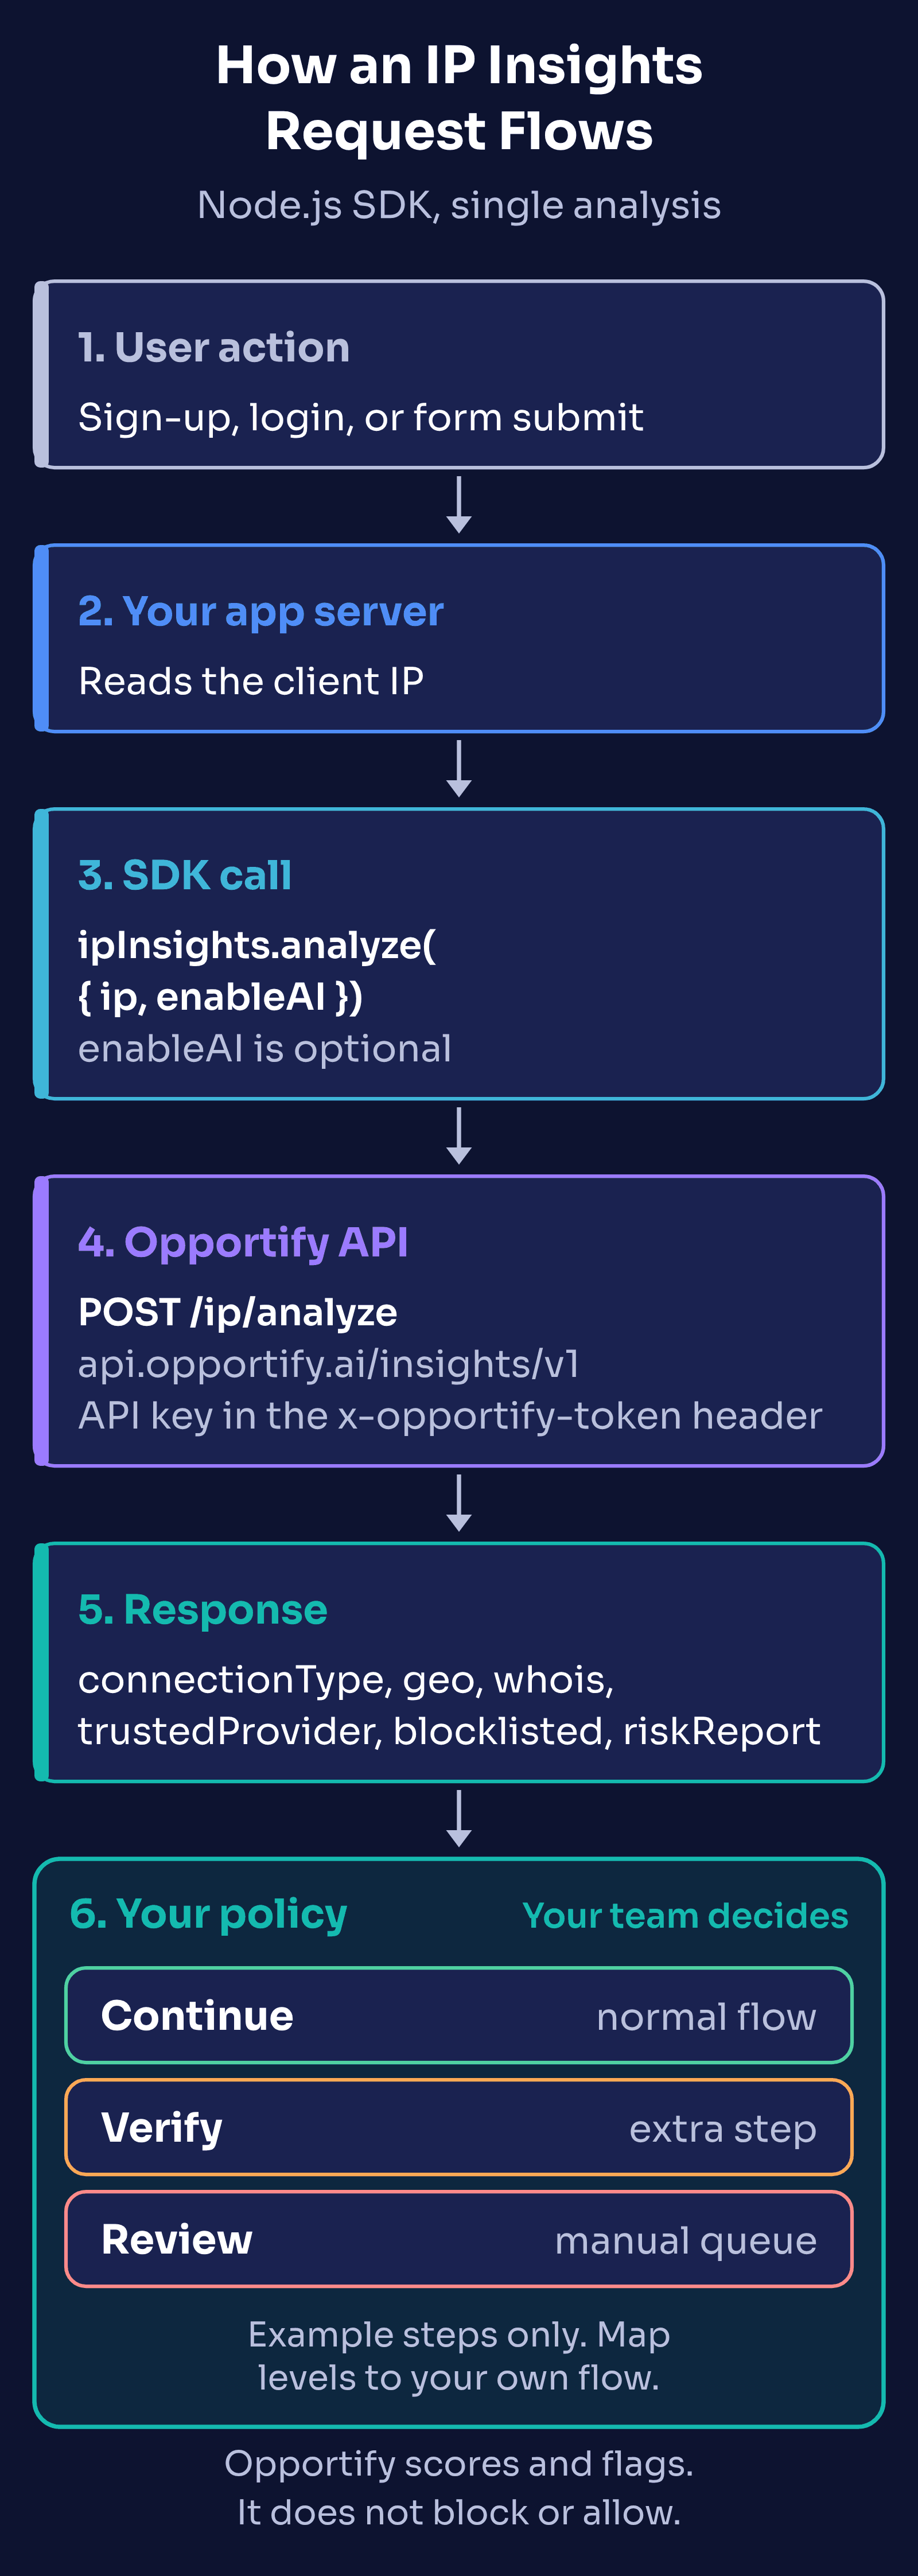
Under the hood, the SDK calls POST /ip/analyze. Per the Analyze IP API reference, the API key travels in a request header (x-opportify-token), and the API avoids query parameters for all operations so that sensitive data does not end up in access logs, browser history, or cached URLs.
Analyze a Single IP
The IPInsights class exposes analyze(), which takes the IP address and an optional enableAI flag. Both IPv4 and IPv6 are supported.
import { IPInsights } from "@opportify/sdk-nodejs";

// getSecret() is a placeholder for your secret manager client.
const ipInsights = new IPInsights({
  apiKey: await getSecret("opportify-api-key"),
});

const result = await ipInsights.analyze({
  ip: "203.0.113.42", // documentation-range address (RFC 5737), for illustration
  enableAI: true, // optional
});

console.log(result.connectionType); // e.g. "wired", "vpn", "open-proxy"
console.log(result.riskReport.score); // 200 to 1000, higher is riskier
console.log(result.riskReport.level); // "lowest" | "low" | "medium" | "high" | "highest"
console.log(result.riskReport.baseAnalysis); // top risk factors, e.g. ["ip-blocklisted"]
About enableAI: it is an optional request parameter, documented on the Analyze IP reference and the SDK page. Availability depends on your account; see pricing for details. We set it explicitly in these examples rather than relying on a default.
Read the Response
A successful call returns one object. These are the top-level fields from the API reference, all of which are marked required in the schema:
| Field | What it holds |
|---|---|
ipAddress, ipAddressNumber, ipType, ipCidr |
The analyzed address, its numeric form, IPv4 or IPv6, and its CIDR block |
connectionType |
One of wired, mobile, enterprise, satellite, vpn, cloud-provider, open-proxy, or tor |
hostReverse |
Reverse DNS lookup result |
geo |
Location data such as continent, countryCode, countryName, region, city, timezone, latitude, and longitude |
whois |
rir, asn (asnId, asName, ...), organization, and abuseContact, adminContact, techContact |
trustedProvider |
isKnownProvider, plus provider, providerType, and description when known |
blocklisted |
isBlockListed, sources, activeReports, and lastDetected |
riskReport |
score (200 to 1000), level, and baseAnalysis (the highest-weight risk factors) |
The riskReport object is the Explainable Risk Report: the score, the level, and the factors that explain it. The API reference notes that baseAnalysis lists the highest-weight factors, and that additional lower-weight signals may exist outside the array.
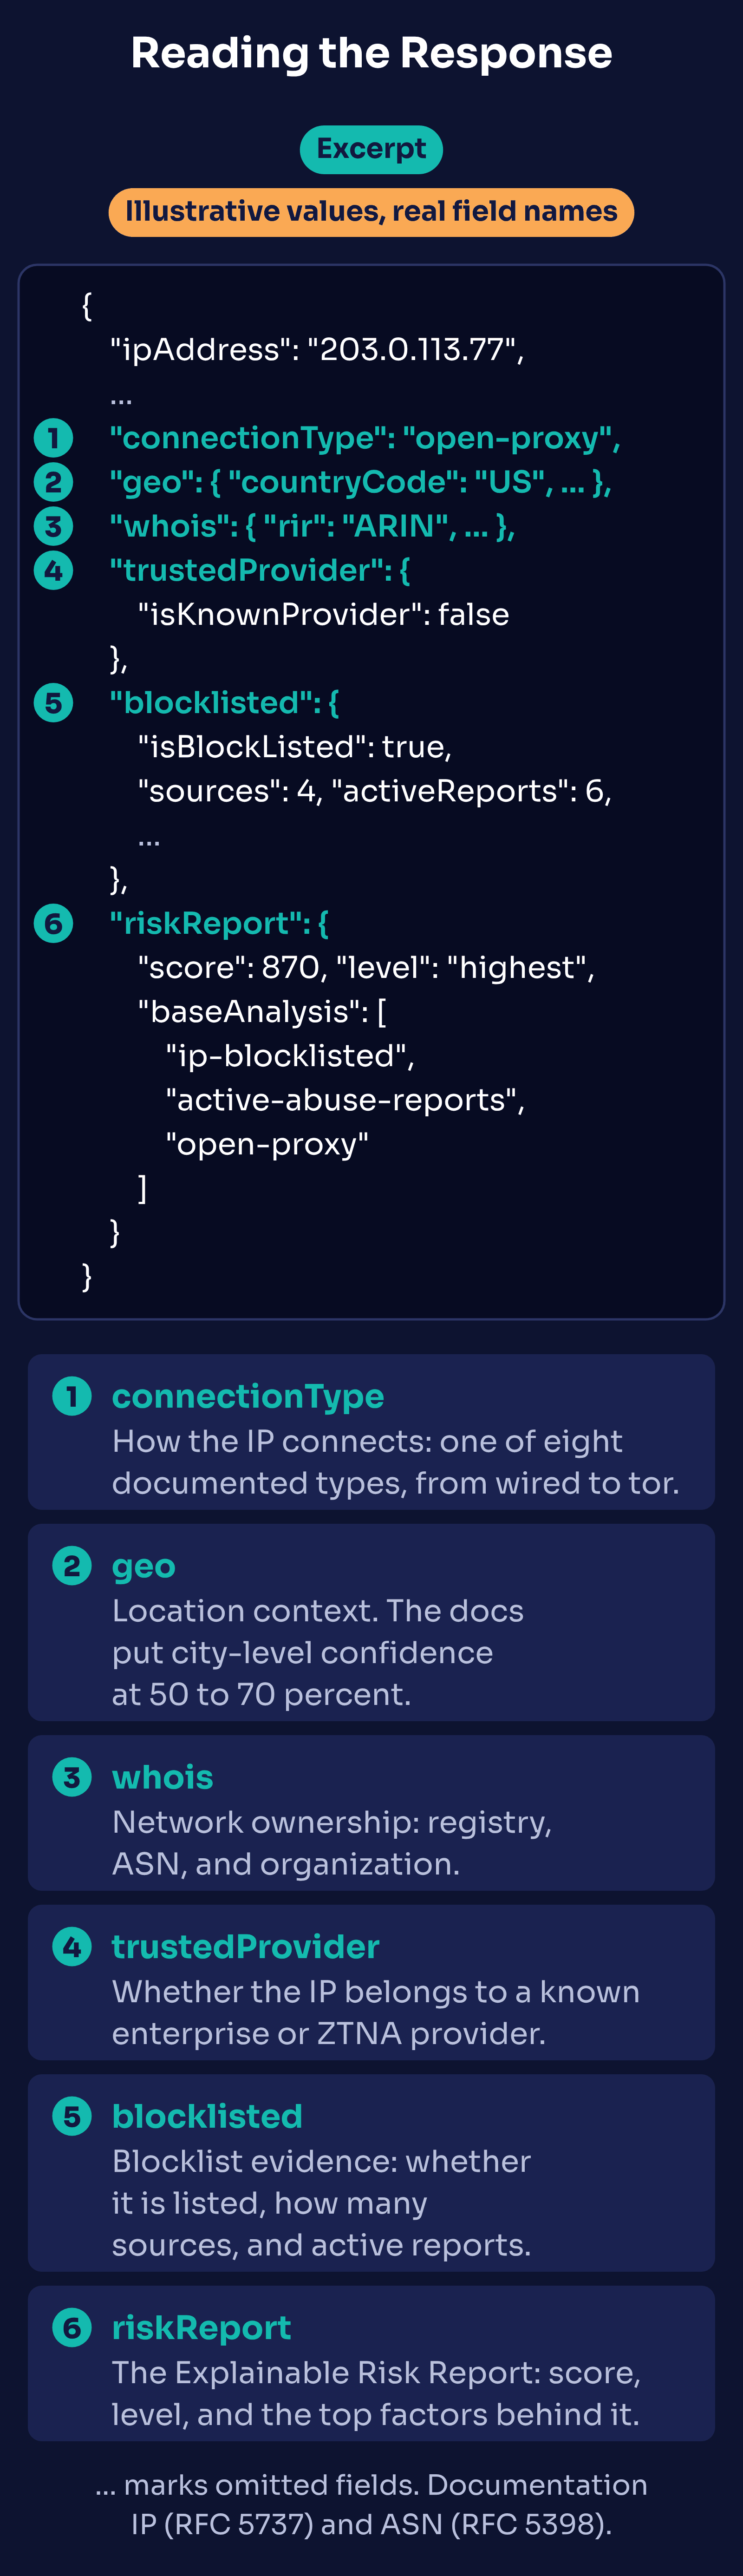
The risk levels map to fixed score ranges in the API reference: lowest is 200 to 300, low is 301 to 400, medium is 401 to 600, high is 601 to 800, and highest is 801 to 1000. The levels stay stable while the underlying model is retrained, so key your logic to level and baseAnalysis rather than to an exact score.
Route Results to a Step Your Team Defines
IP Insights returns signals. It does not accept, reject, or block anything. The pattern below maps each level to a step in your own flow. The mapping is an illustrative example: your team should set it based on your risk tolerance and your other signals.
// Illustrative policy. Your team owns these choices.
const IP_POLICY = {
  lowest: "continue",
  low: "continue",
  medium: "monitor", // e.g. flag for later sampling
  high: "verify", // e.g. add an email or phone confirmation step
  highest: "review", // e.g. hold for a manual review queue
};

export function routeByIpRisk(result) {
  const level = result.riskReport?.level;
  const factors = result.riskReport?.baseAnalysis ?? [];

  return {
    step: IP_POLICY[level] ?? "review", // unknown level: let a person look
    level,
    score: result.riskReport?.score,
    factors, // store these so reviewers can see why
  };
}
A few practices make this pattern hold up in production:
- Store the result with the record. Save
riskReport.score,riskReport.level,baseAnalysis,connectionType, andblocklistedalongside the sign-up or login event. Reviewers need the factors, and you will want them when you tune the policy. - Read factors, not just levels.
vpnandicloud-private-relayare both VPN-class, but the assessed signals page explains that iCloud Private Relay is scored as lower risk. Anopen-proxywith active reports deserves a different response than a VPN with an old blocklist entry. - Combine signals. IP is one layer. Pair it with email and session signals before you take an action a real customer would notice. Our VPN, proxy, and Tor guide shows how to avoid turning away legitimate VPN users.
Example: an Express sign-up handler
This example assumes your app runs behind a load balancer or proxy. Set Express's trust proxy setting to match your infrastructure so that req.ip holds the client address rather than the proxy's.
import express from "express";
import { IPInsights } from "@opportify/sdk-nodejs";
import { routeByIpRisk } from "./ipPolicy.js";

const app = express();
app.set("trust proxy", 1); // match your own proxy setup
app.use(express.json());

const ipInsights = new IPInsights({
  apiKey: await getSecret("opportify-api-key"),
});

// Node can report IPv4 clients as IPv4-mapped IPv6 ("::ffff:203.0.113.42").
function clientIp(req) {
  const ip = req.ip ?? "";
  return ip.startsWith("::ffff:") ? ip.slice(7) : ip;
}

app.post("/api/signup", async (req, res) => {
  let ipCheck;
  try {
    const result = await ipInsights.analyze({
      ip: clientIp(req),
      enableAI: true,
    });
    ipCheck = routeByIpRisk(result);
  } catch (error) {
    // If the check is unavailable, record that and let your policy decide.
    ipCheck = { step: "check-unavailable" };
  }

  const account = await createPendingAccount(req.body, { ipCheck });

  if (ipCheck.step === "verify") {
    return res.json({ next: "verify-email", accountId: account.id });
  }
  if (ipCheck.step === "review") {
    await addToReviewQueue(account.id, ipCheck);
  }
  return res.json({ next: "welcome", accountId: account.id });
});
createPendingAccount and addToReviewQueue stand in for your own code. What happens when the check is unavailable is a business decision. Some teams continue and review later; others add a verification step.
Handle Errors
The SDK normalizes API errors into a typed ErrorResponse with two fields, errorCode and errorMessage. When the API returns an error body, errorCode carries the API's own code, such as IP_VALIDATION_FAILED, INVALID_TOKEN, NOT_FOUND, or TOO_MANY_REQUESTS (all listed in the Analyze IP reference). When there is no usable body, the SDK falls back to codes like "HTTP_403" or "REQUEST_ERROR". You can see this passthrough in the SDK source on GitHub. Wrap every call in try/catch. This snippet is TypeScript, matching the SDK docs, and reuses the ipInsights client from above.
import type { ErrorResponse } from "@opportify/sdk-nodejs";

try {
  const result = await ipInsights.analyze({
    ip: "198.51.100.7", // documentation-range address (RFC 5737), for illustration
    enableAI: true,
  });
} catch (error: unknown) {
  const err = error as ErrorResponse;
  switch (err.errorCode) {
    case "IP_VALIDATION_FAILED": // 400: not a valid IPv4 or IPv6 address
    case "MALFORMED_REQUEST": // 400/403: fix the request, do not retry
    case "NOT_FOUND": // 404: IP not found in any RIR database
      handleBadInput(err);
      break;
    case "INVALID_TOKEN":
    case "FORBIDDEN":
    case "INVALID_PLAN":
    case "QUOTA_EXCEEDED":
    case "HTTP_403": // 403: key, permission, or quota problem: check the key and your account settings
      alertOnCall(err);
      break;
    case "TOO_MANY_REQUESTS":
    case "HTTP_429": // rate limited: back off before retrying
    default: // 5xx or network errors: retry with backoff, then fall back to your policy
      scheduleRetry(err);
  }
}
handleBadInput, alertOnCall, and scheduleRetry stand in for your own code.
The status codes documented for POST /ip/analyze are:
| Code | Meaning (from the API reference) |
|---|---|
| 200 | The IP analysis is successful |
| 400 | The request is improperly formatted, or the IP is invalid |
| 403 | An authentication or permission error |
| 404 | The IP address was not found in any RIR database |
| 500 | Internal server error |
The batch endpoints can also return 413 when the payload is over 3 MB. Authentication, quota, and rate-limit problems all come back as 403, with an error code such as TOO_MANY_REQUESTS for rate limits. Do not rely on a Retry-After header: retry rate-limited calls with exponential backoff and avoid large retry bursts.
Analyze IPs in Batches
For larger lists, such as auditing existing accounts or reviewing a day of traffic, submit a batch job. Batches run asynchronously and return a jobId you can poll.
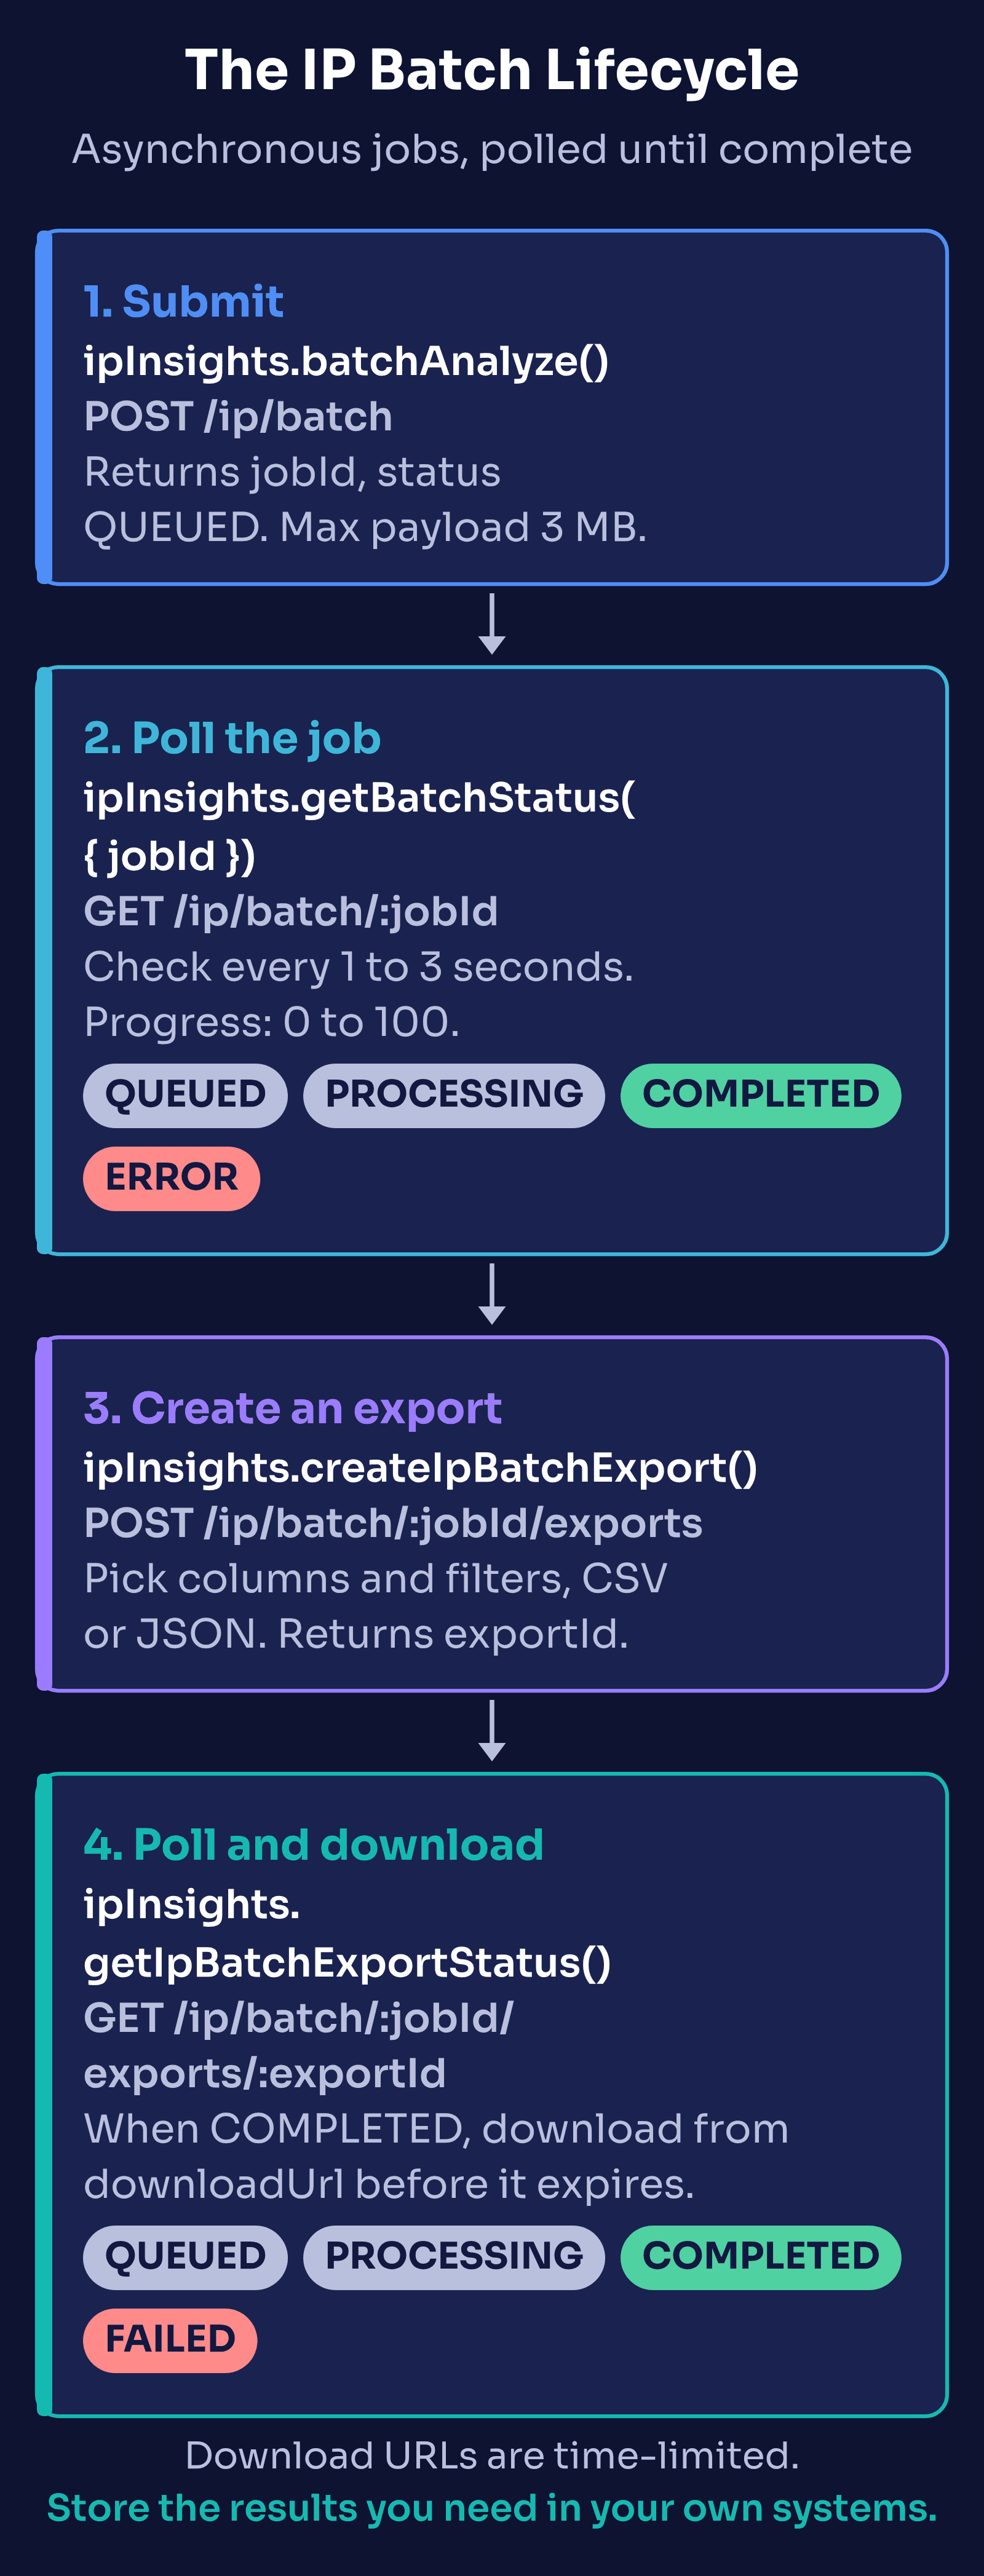
Submit and poll
const batch = await ipInsights.batchAnalyze({
  ips: ["192.0.2.10", "198.51.100.23", "203.0.113.5"], // documentation-range examples
  name: "Weekly account audit", // optional
  enableAI: true, // optional
});

const jobId = batch.jobId;

async function waitForBatch(
  jobId,
  { intervalMs = 2000, timeoutMs = 10 * 60 * 1000 } = {},
) {
  const started = Date.now();
  while (Date.now() - started < timeoutMs) {
    const status = await ipInsights.getBatchStatus({ jobId });
    if (status.status === "COMPLETED") return status;
    if (status.status === "ERROR")
      throw new Error(status.statusDescription || "Batch failed");
    console.log(`Batch ${jobId}: ${status.status}, ${status.progress ?? 0}%`);
    await new Promise((r) => setTimeout(r, intervalMs));
  }
  throw new Error("Batch did not complete in time");
}

const done = await waitForBatch(jobId);
console.log(done.downloadUrls?.json); // also csv, csvCompressed, jsonCompressed
Details from the docs worth knowing:
- Status values:
QUEUED,PROCESSING,COMPLETED, orERROR. OnERROR, readstatusDescription.progressruns from 0 to 100. - Polling cadence: the SDK page recommends a short delay of 1 to 3 seconds between status checks.
- Payload limit: 3 MB per request. Split larger lists into several jobs.
- Input formats: the Batch Analyze IPs reference accepts JSON arrays, CSV, TSV, or XLSX uploads, and line-separated text.
- Results: when the job completes,
downloadUrlsholds pre-signed links for CSV, JSON, and gzip-compressed versions. They are time-limited, so download promptly and store what you need. - Partial failures: per the FAQ, a batch keeps processing when some items fail, and errors are flagged in the output so you can resubmit only those entries.
Export a filtered view
Exports let you pull only the rows and columns you need from a completed job, for example every IP your policy would send to review.
const created = await ipInsights.createIpBatchExport({
  jobId,
  exportRequest: {
    exportType: "csv", // or "json"
    columns: [
      "result.ipAddress",
      "result.connectionType",
      "result.riskReport.score",
      "result.riskReport.level",
    ],
    filters: {
      "result.riskReport.level": ["high", "highest"],
    },
  },
});

async function waitForExport(
  jobId,
  exportId,
  { intervalMs = 2000, timeoutMs = 10 * 60 * 1000 } = {},
) {
  const started = Date.now();
  while (Date.now() - started < timeoutMs) {
    const status = await ipInsights.getIpBatchExportStatus({ jobId, exportId });
    if (status.status === "COMPLETED") return status;
    if (status.status === "FAILED") {
      throw new Error(
        `Export failed: ${status.errorCode} ${status.errorMessage}`,
      );
    }
    await new Promise((r) => setTimeout(r, intervalMs));
  }
  throw new Error("Export did not complete in time");
}

const exportStatus = await waitForExport(jobId, created.exportId);
console.log(exportStatus.downloadUrl, exportStatus.expiresAt); // download before expiresAt
waitForExport polls getIpBatchExportStatus the same way waitForBatch polls the job: its status moves through QUEUED, PROCESSING, and then COMPLETED or FAILED. The Create IP Batch Export reference documents the filter rules: string filters accept exact values, comma-separated lists, or arrays; numeric filters accept exact values, arrays, or min/max ranges; nested fields use dot notation. Limits are 25 filters, 50 values per filter, and 100 columns. If the batch has not finished, the export request returns 409.
Production Checklist
- Secrets: load the API key from a secret manager, never from source code. Rotate keys by deploying a new key first, confirming it works, then removing the old one, as the FAQ describes.
- ACL rules: restrict API access to your servers' IP addresses or ranges with ACL rules in your account.
- No sensitive data in URLs: the API takes everything in headers or the request body. Keep it that way in your own logs and proxies.
- Short-lived caching: the FAQ says blocklist data is updated continuously and recommends caching results locally only for short periods to avoid repeated calls.
- Store the factors: keep
riskReportand the key signals with each event so reviewers can see why a request was flagged. - Test your policy: documentation-range addresses (RFC 5737) are not routed on the public internet, so a live call with one may return
404(not found in any RIR database). In unit tests, mock theIPInsightsclient and return fixture responses, then test eachlevelvalue, each error path, and the "check unavailable" path.
Next Steps
- Read the Node.js SDK documentation and the SDK overview.
- Browse the IP Insights endpoints in the API reference.
- Learn how to read a result in IP Reputation Check Explained, or try an address in the free IP reputation checker.
- See IP Insights for product details and pricing for plans.
The Opportify SDK is also available for Python, PHP, and Java. See the SDK overview for each language's setup.